So, you have an acoustic release which you can use to recover, monitor inclination, and localise your seabed assets. But how do you localise this position and why do you want to?
Seabed data is massively more valuable when it’s geo referenced, the dual functionality of acoustic release, acoustic transponder and inclinometer are key functions of the RT6 family.
Here we are going to focus on two ways of localising our acoustic releases:
- Using the RT 6-1000 app
- Using Ranger 2
Using the RT 6-1000 app
The RT 6-1000 app is designed to run on android smart phones and has some neat features for localising your seabed assets when attached to an RT 6-1000.
It is possible to derive an approximate location of the deployed RT 6-1000 using the “Locate” function in the RT6 App.
When the Locate process is started and the Topside Control is transmitting, the RT6 App stores the GPS position of the Android device. When the ranges are uploaded the RT6 App uses the timestamp of the ranges to link them with the Android device location at the time of the ranges. This information is stored to the database and a circle is plotted on the MAP page with a radius matching this range.
By either repeating this process or by moving vessel location during the ranging process ( a circle around the approximate location of the transponder of radius >1.5 water depth is optimal if possible), a series of overlapping circles will show on the map will give a clear indication of the deployed transponder’s location.
Below we will go step by step through the steps to use the app.
- Secure a suitable rope to the release endcap shackles ready for dunking.
- Open the RT6 App.
- Tap Locate.

- The Device Status displays the UID, Address and Firmware of the Topside Control RT 6-1000.
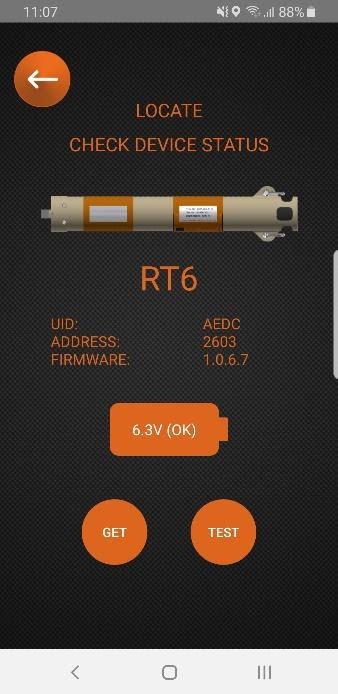
- Tap Get to refresh the information.
- Tap Next and then tap Select Address (select the address of the subsea RT 6-1000).

- Tap Locate (the Topside Control RT 6-1000 will begin transmitting every five seconds and a message confirmation will confirm if the command has been successful).

- The Topside Control RT 6-1000 is now ready to be dunked over the side to allow the range to the RT 6-1000 to be measured. Typically this involves sailing in a circular pattern in the area where the RT 6-1000 is believed to be deployed.
- The Locate status is visually displayed by the blue LED on the end cap as follows:
- Locating (collecting ranges): LED flashes every five seconds.
- After two successful telemetry commands have completed: LED changes to solid (the Topside Control RT 6-1000 will continue to collect ranges)
- When enough ranges have been collected, hold the NFC Android device against the Topside Control RT 6-1000 to automatically retrieve the ranges back to the NFC Android device; if this upload fails, tap STOP AND GET RANGES to upload the ranges again.
- The app will display an estimated position for your RT 6-1000 and you can add a waypoint at this location:

Using Ranger 2
All RT6 releases are supported in Ranger 2 with our shallow water releases also available in Micro-Ranger 2.
Did you know you can also release LMF releases with an MF USBL system? There’s an article in this knowledge base on that.
Simple waypoints and localisation
When using Ranger 2 it’s incredibly simple to add a waypoint by simply clicking the waypoint button in the software.
You can then drop a waypoint on your tracked location which will show on your navigation screen in Ranger 2, you can name this waypoint whatever you like and you can even export this waypoint to a text file.
Need more accuracy?
If you have a Ranger 2 USBL system, why not take full advantage of the accuracy? The average fix tool in Ranger 2 allows you to locate and average the position of your release transponder across multiple cycles, and it gives you a report you could deliver to a client!
Follow the steps below to do this:
- Begin tracking your RT6
- Select the RT6 of interest from the beacon list
- Click start to begin logging data, click stop to stop logging data.

- Review the statistical data for each beacon, you can even reject outliers.

- Click add waypoint to drop a waypoint on the averaged position.
- You can also export to a CSV file or a PDF report which can be delivered to a client as proof of an accurate deployment!

Contact [email protected] for more information.